
How to see 3D images without any equipment (apart from your eyes) – From simple stereograms to autostereograms
10 September 2026
Stereograms consist of pairs of images, with small spatial discrepancies between them, which, when viewed in such a way that each eye is exposed to one of those images, give rise to a vivid, albeit illusory, perception of depth. This perception of three-dimensionality results from the fact that the pair of images in the stereogram encodes binocular disparities (small differences in the relative position of elements in the optical images projected onto the retinas) similar to those that arise naturally because of the horizontal separation between our two eyes (the interpupillary distance), typically around 6 cm. Despite the wide variety of devices for stereoscopic presentation, from common and inexpensive anaglyph glasses, to virtual reality systems, via polarised lenses (commonly used in 3D cinema), all are based on exactly the same perceptual principles.
Although these stereoscopic devices conveniently facilitate the binocular fusion required for stereoscopic perception, and are therefore an invaluable resource in laboratory research on binocular perception, they are not strictly necessary – with some practice and patience, it is possible to see a stereoscopic image solely by voluntarily controlling the eye muscles. After a brief explanation of how stereoscopic fusion can be achieved without any special equipment, apart from two functional eyes, this guide proposes a set of short exercises for that purpose, of increasing difficulty, culminating in autostereograms. This is a relatively important skill for anyone studying perception, including students, and it will be very useful when reading books on perceptual science or journal articles dealing with stereoscopy, since they often include stereograms that assume and presuppose readers who are capable of spontaneously perceiving stereoscopic demonstrations like those shown below.
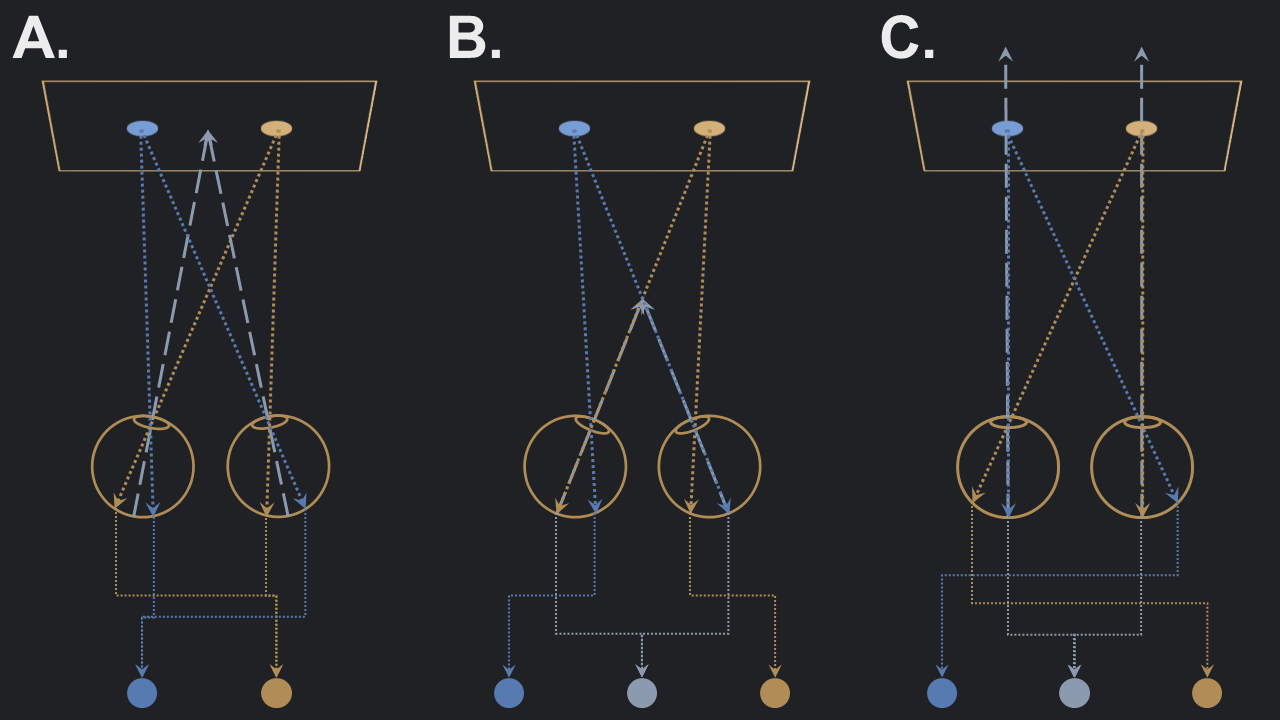
As mentioned above, stereoscopy occurs when two slightly different images are presented separately to each eye. In stereograms that can be viewed without specialised equipment, these images are shown side by side. When one fixates the same plane on which the two images are shown (see panel A in Figure 1; the fixation point is represented by the intersection of the two greyish-blue dashed lines – these represent the principal visual direction, that is, the visual line that falls on the fovea), the two images (schematically represented in Figure 1 as two small circles of different colours) will naturally stimulate roughly corresponding points on the retinas of both eyes (circular diagrams). Each pair of corresponding points is fused into a single image (dotted lines below), resulting in the veridical perception of two images side by side (bottom of the image). The stereoscopic fusion of the two images can, however, be achieved by fixating a specific point either in front of or beyond the plane of the images, as shown in panels B and C of Figure 1. In the case of panel B, a point closer to the observer than the plane of the images is fixated, such that the image on the left in the stereogram is projected onto the fovea of the right eye and the image on the right in the stereogram is projected onto the fovea of the left eye – for this reason, this is called cross-eyed or cross-view. Note that, when this is done, the two images, falling on the foveas of both eyes (corresponding points), are fused into one (represented in greyish-blue at the bottom of the diagram). Because each of the images in the stereogram also stimulates non-corresponding points on the retinas of the two eyes, visual duplication occurs (diplopia) – in practice, the observer will see three images, with the central one resulting from stereoscopic fusion and, therefore, being perceived three-dimensionally (insofar as the images suitably encode binocular disparities). Something similar can be achieved if, instead of fixating a point closer to the observer, one fixates a more distant point, such that the two images in the stereogram are projected onto the foveas of the two eyes in the usual left-eye/left-image and right-eye/right-image arrangement (see panel C of Figure 1) – the image on the left in the stereogram onto the fovea of the left eye, and the image on the right in the stereogram onto the fovea of the right eye. This is therefore called parallel-eyed or parallel-view. The perceptual result will likewise be three images, the central one being the result of stereoscopic fusion.
Because, depending on the chosen viewing method, the image on the left side of the stereogram will be seen by the left eye (parallel viewing) or by the right eye (cross-eyed viewing), and vice versa, the positioning of the images in stereograms is done assuming a specific viewing method, which is usually specified. When a stereogram prepared for parallel viewing is seen with cross-eyed viewing, or the reverse, one of two things can happen: if the stereogram consists of simple elements, with few or no pictorial depth cues, three-dimensionality will be inverted, with elements that should appear closer/farther away being perceived as farther away/closer; if the images are more complex, with several pictorial cues (shadows and shading, perspective, occlusions, etc.), stereoscopic fusion may fail and the perception will be that of a normal two-dimensional image (incongruities between pictorial depth cues, which are monocular, and binocular disparity are usually resolved by the visual system by favouring the former over the latter). Moreover, some people find it easier to achieve stereoscopic fusion with parallel viewing, while others find it easier with cross-eyed viewing (as is my case). In the exercises below, specific instructions will be given for each viewing method, and the stereograms will be presented in both versions (except in the case of the autostereogram).
Level 0 – Controlling vergence eye movements
In everyday life, we tend to fixate objects of interest (that is, to direct the principal visual directions of both eyes towards the object) and to direct our attention towards them. In other words, our attention tends to follow our eye fixations. To see a stereogram, it is necessary to reverse this tendency and attend to objects (or, in this case, images) that are not directly fixated – otherwise, we end up in the situation represented in panel A of Figure 1, in which we simply perceive, veridically, two images side by side.
To do this, some voluntary control over the position of our eyes is needed while we attend to visual elements that are not fixated. Perceptually, objects beyond or in front of the fixation point (strictly speaking, beyond or in front of the horopter) give rise, respectively, to uncrossed and crossed diplopia. Diplopia (clinical forms of diplopia are excluded here) is simply the name given to "double vision", that is, to the perception of a duplication of the objects being viewed. The terms uncrossed and crossed merely specify the nature of the diplopia – when the image on the left side of the diplopia is seen by the left eye and the image on the right side by the right eye, we have uncrossed diplopia; otherwise, crossed diplopia occurs.
The first step in seeing a stereogram consists precisely in being able to attend to diplopias (these are usually ignored by our visual system). Figure 2 shows a single blue circle. With Figure 2 in your visual field, try to fixate a point that is farther away or closer than the screen – it may help if you have a specific object that can be fixated. For example, for cross-eyed viewing, start by trying to fixate the tip of your nose or, if you prefer, place one of your fingers vertically between your eyes and the screen and fixate the finger with your gaze. Simultaneously, and without ceasing to fixate the tip of your nose or the finger, attend to the circle in Figure 2. You should see not one but two blue circles side by side. These may be more or less separated from one another depending on whether the finger you are fixating is closer to or farther from your face – if you are fixating the tip of your nose, the horizontal separation between the two circles should be maximal. You can now close one eye and then the other, verifying that the left eye sees the image of the circle on the left side of the diplopia, and vice versa – you should thus confirm that, for the circle on the screen, you have uncrossed diplopia. In the case of parallel viewing, you should follow the same instructions, but fixate an object that is farther away from you than the screen (unless you are Pinocchio, trying to fixate the tip of your nose will be ill-advised for this purpose). The easiest way is to fixate a point on a distant wall and place the screen in front of your eyes without changing fixation. Now attend to Figure 2 without changing the position of your eyes (that is, continue fixating the wall, even if you can no longer see it because it is hidden by the screen). You should again see two blue circles instead of just one. If you alternately close one eye and the other, you can verify that the circle on the left side is seen by the right eye and the circle on the right side is seen by the left eye – that is, you have crossed diplopia.

It may be easier for you to see diplopias by fixating a point closer than the screen (your nose or a finger) than by fixating a more distant point (a wall behind the screen), or vice versa. This greater ease/difficulty will later affect which stereoscopic viewing method is more accessible to you: cross-eyed or parallel viewing. You can continue to practise this exercise in everyday life to improve your control over vergence eye movements (do not try to do this in situations where it could pose a risk, such as while driving).
Once you have mastered the previous exercise, and can see diplopias whenever you wish, you can move on to the next exercise, based on Figure 3. Here, two small circles are shown, arranged horizontally. While keeping Figure 3 in your field of view, repeat what you did previously, fixating a point closer or farther away than the screen, and attend to the diplopias that result. In this case, because there are two circles rather than just one, diplopia will lead to the perception of four circles. This is now the critical moment in preparing to view stereograms: try to adjust the vergence of your eyes, by fixating a point more or less close to you, until the two central circles of the four resulting from diplopia coincide with one another – that is, by adjusting the position of your eyes, try to see neither four nor two circles, but three, with the middle one resulting from the overlap of two diplopic images. It may be relatively challenging not only to reach that point but also to maintain it; with some practice, however, you will be able to do it almost instantly whenever you wish. When that happens, you are ready to see the stereograms that follow!

Level 1 – Simple stereograms with geometric shapes
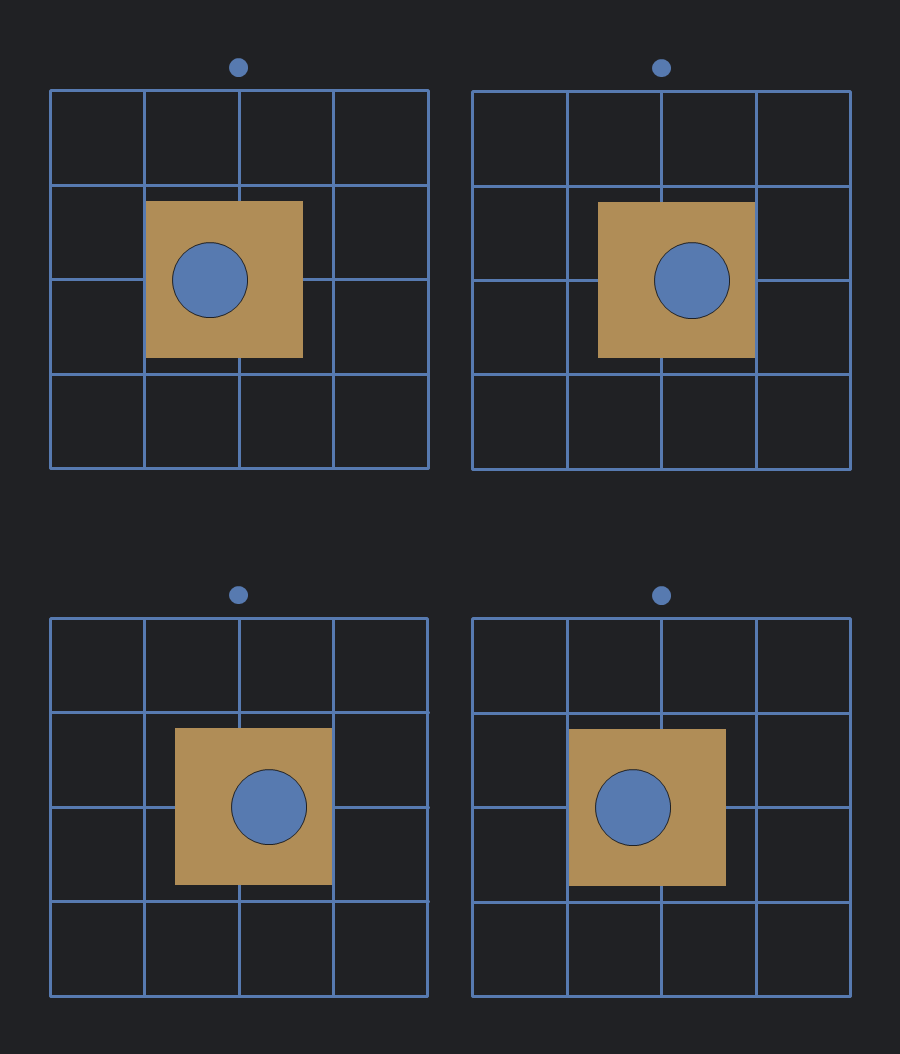
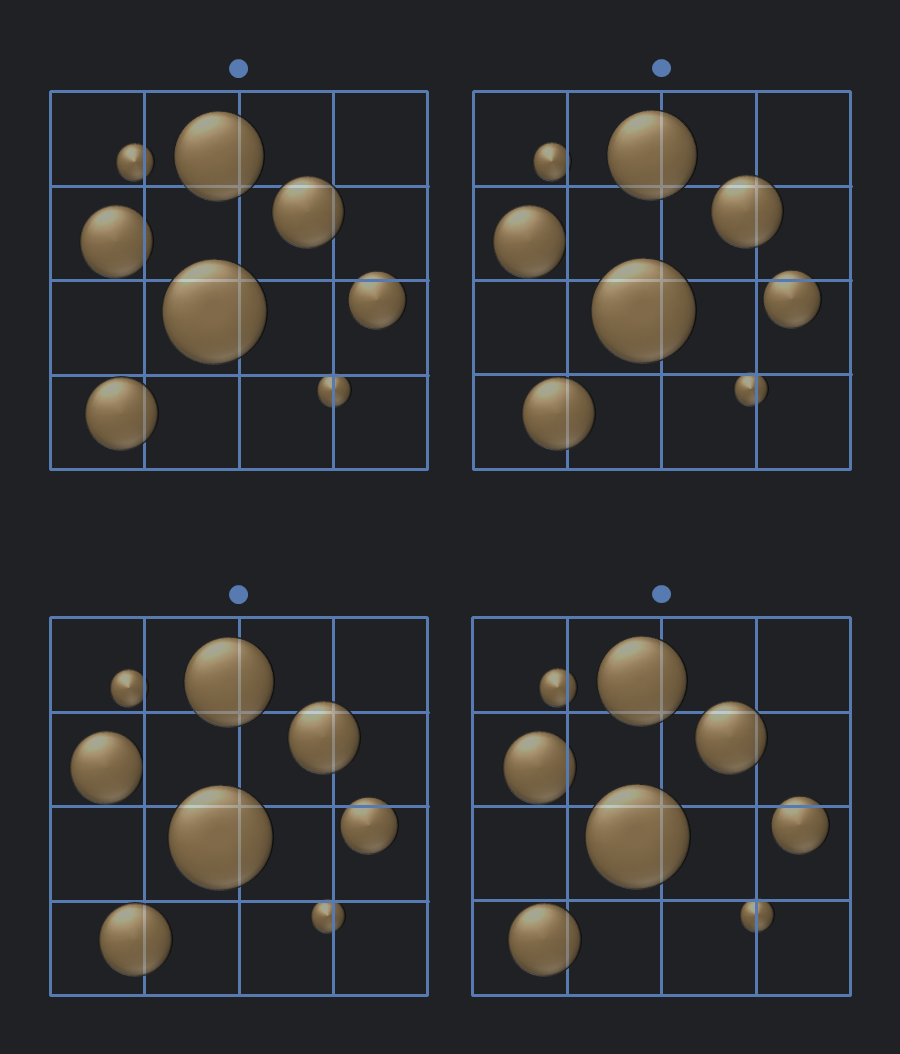
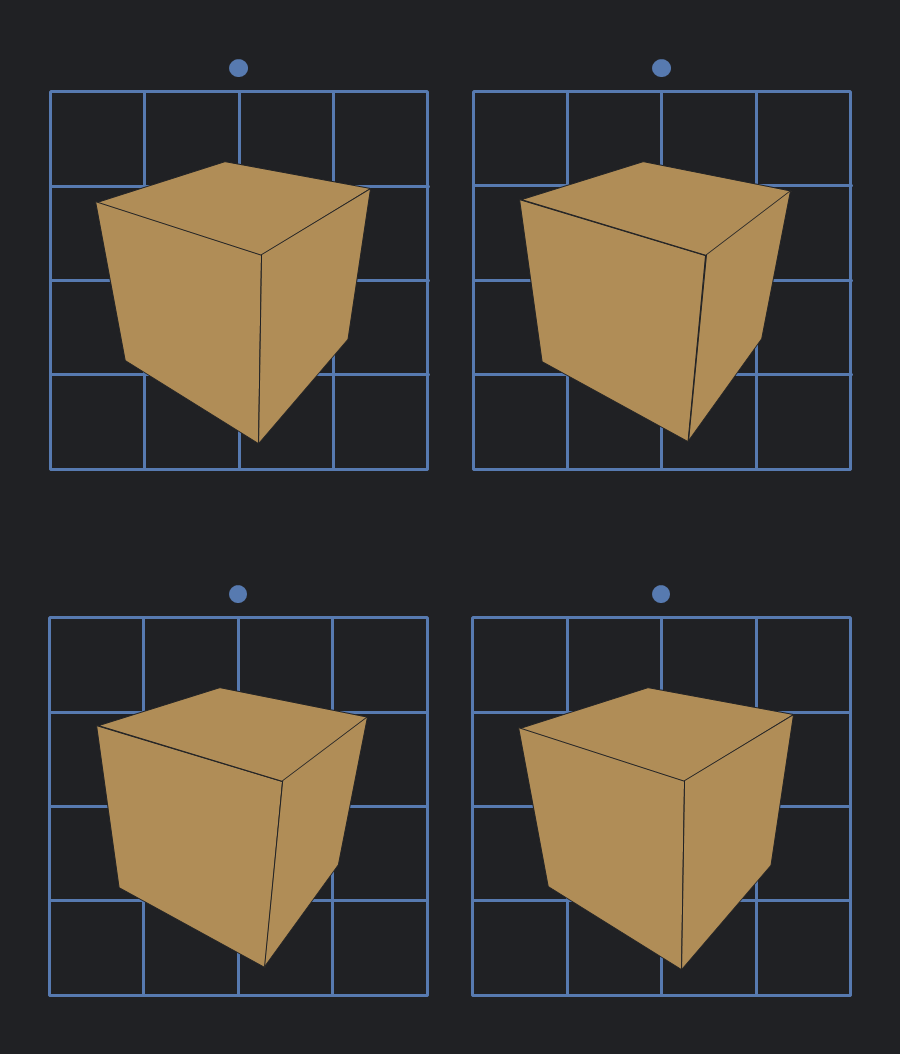
Figures 4, 5, and 6 present simple stereograms, consisting of geometric shapes such as squares, circles, and triangles. All of them consist, as specified above, of two similar images, side by side. Between the two, only the relative positioning of the geometric shapes changes: they are slightly more to the left or to the right in the images on the left or right, in order to encode binocular disparity. Above each of the images in each stereogram there is a small dot – this serves to help stereoscopic fusion by repeating what you did previously: change the fixation point of your eyes so that, instead of two (or four) dots, you can see three, arranged horizontally. At that moment, in addition to the three dots, you should also see three images of the stereogram instead of two, with the central image giving rise to a vivid perception of a three-dimensional space, with the geometric figures clearly perceived at greater or lesser depth.
All figures include the version for cross-eyed viewing at the top and parallel viewing below. However, you can see either image with either method – if you do, the depth of the elements will simply be inverted: the geometric shapes will appear farther away rather than closer. In either case, however, you will always have a perception of three-dimensionality. It is important to note that, for parallel viewing, the distance between the two images cannot be greater than the observer’s interpupillary distance and, for that reason, it may be impossible if the images appear too large on your screen (the solution is to reduce the zoom in your browser).
Figure 4, below, simply shows the stereogram of a gold-coloured square which, when viewed as intended, clearly appears to float in front of the blue grid.
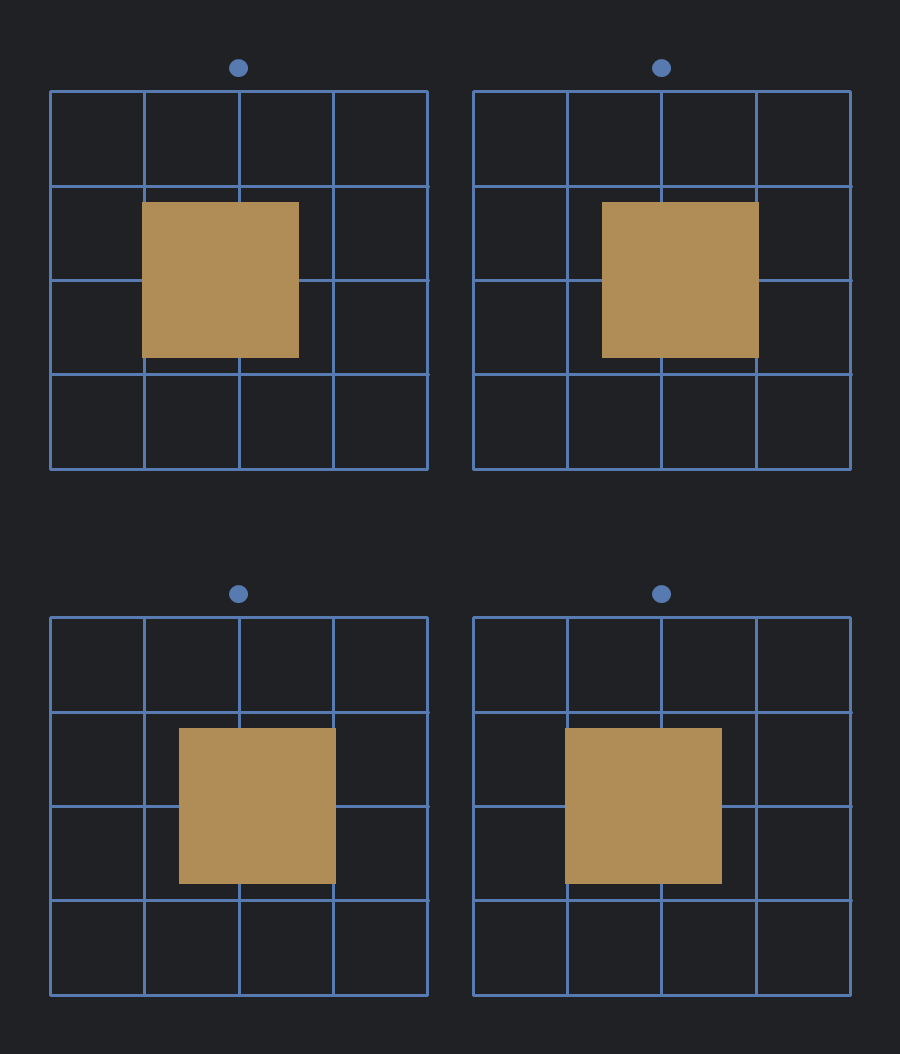
Figure 5, below, shows a stereoscopic version of the Kanizsa Triangle. You can verify that the two images in the stereogram contain three blue circles with small cut-outs, which give rise to the vivid perception of a dark triangle (facilitated by the fact that it also occludes the blue grid behind it). When seen with cross-eyed viewing (top) or parallel viewing (bottom), the dark triangle appears to float in front of the screen, closer to you.
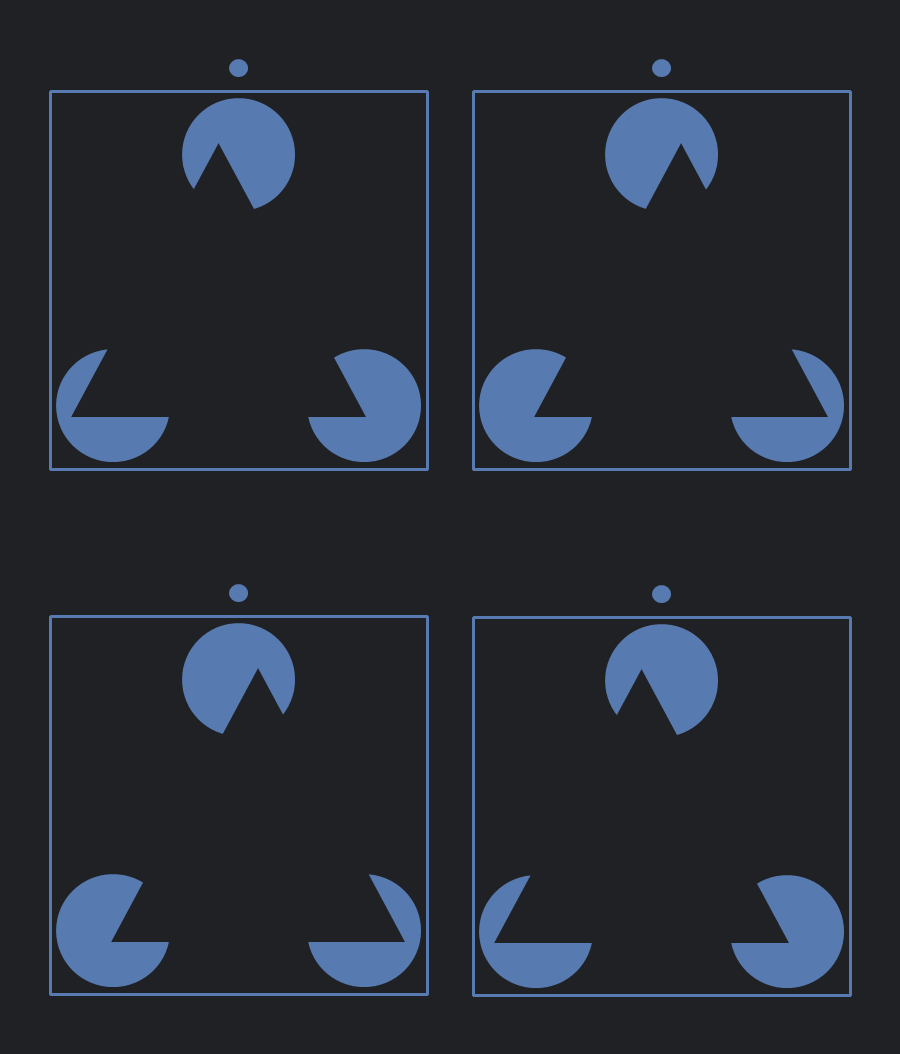
Figure 6, below, shows a slightly more complex stereogram: instead of a single surface floating in front of the screen, you can see, by following the instructions again, a blue circle floating in front of a gold square which, in turn, is closer than the screen.
Finally, Figure 7, below, shows a set of "bubbles" floating in three-dimensional space, each at a different depth (some in front of, others behind, the blue grid).
Level 2 – Stereograms with three-dimensional solids
The stereograms in Figures 8 and 9 are slightly more complex than the previous ones. Instead of merely geometric shapes, they present objects that appear solid. The method for perceiving stereoscopy remains the same.
Figure 8 shows a rectangular cuboid, arranged vertically, with one of its vertices facing the observer. When viewing this stereogram with cross-eyed viewing (top) or parallel viewing (bottom), note how the lateral surfaces of the solid appear diagonally oriented, just as if you were indeed seeing a three-dimensional block.
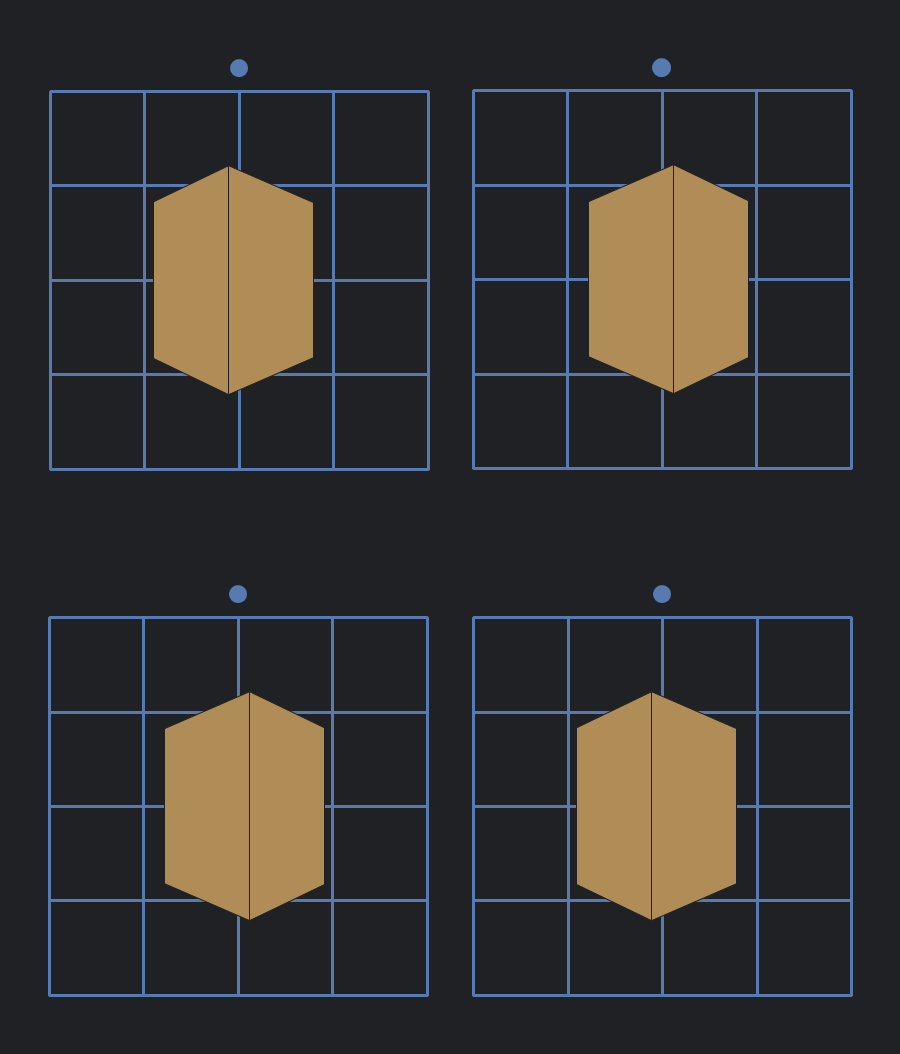
Figure 9, below, similarly shows a gold cube, seen slightly from above.
Level 3 – Photographic stereograms and random-dot stereograms
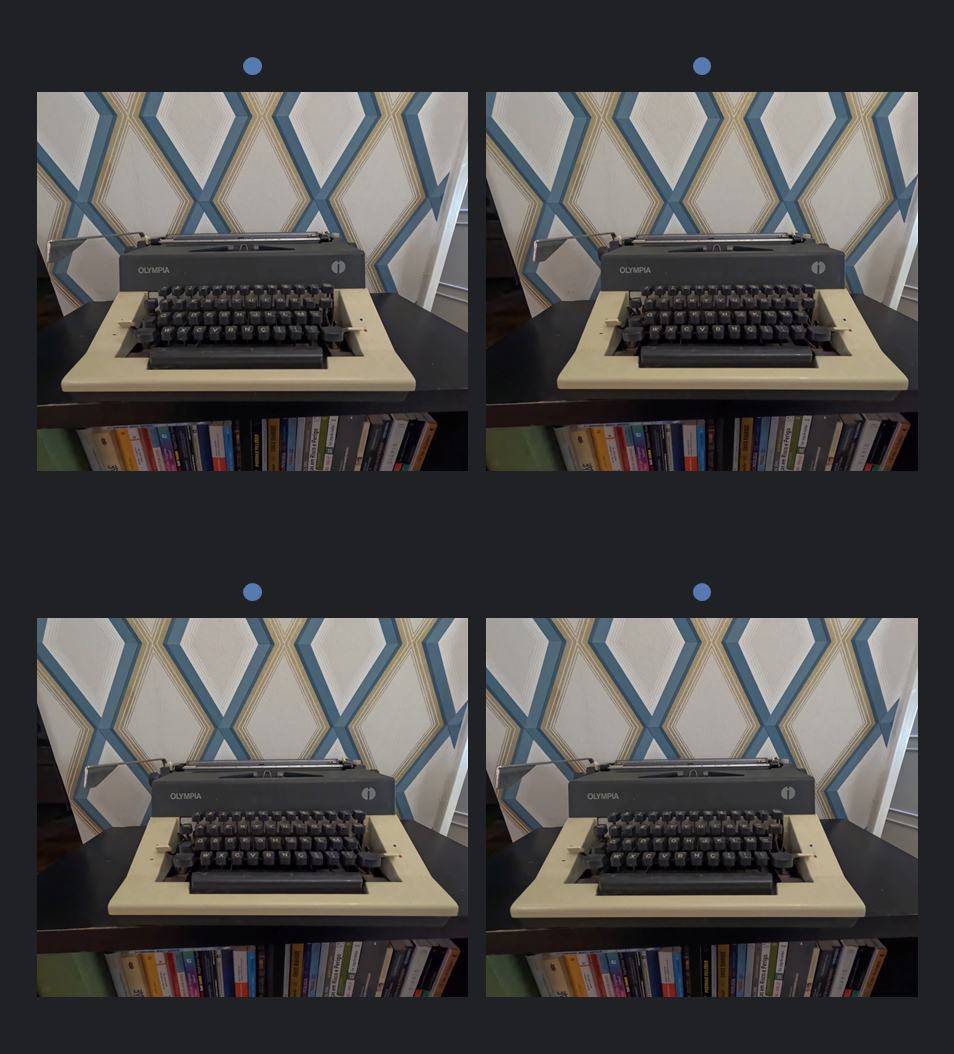
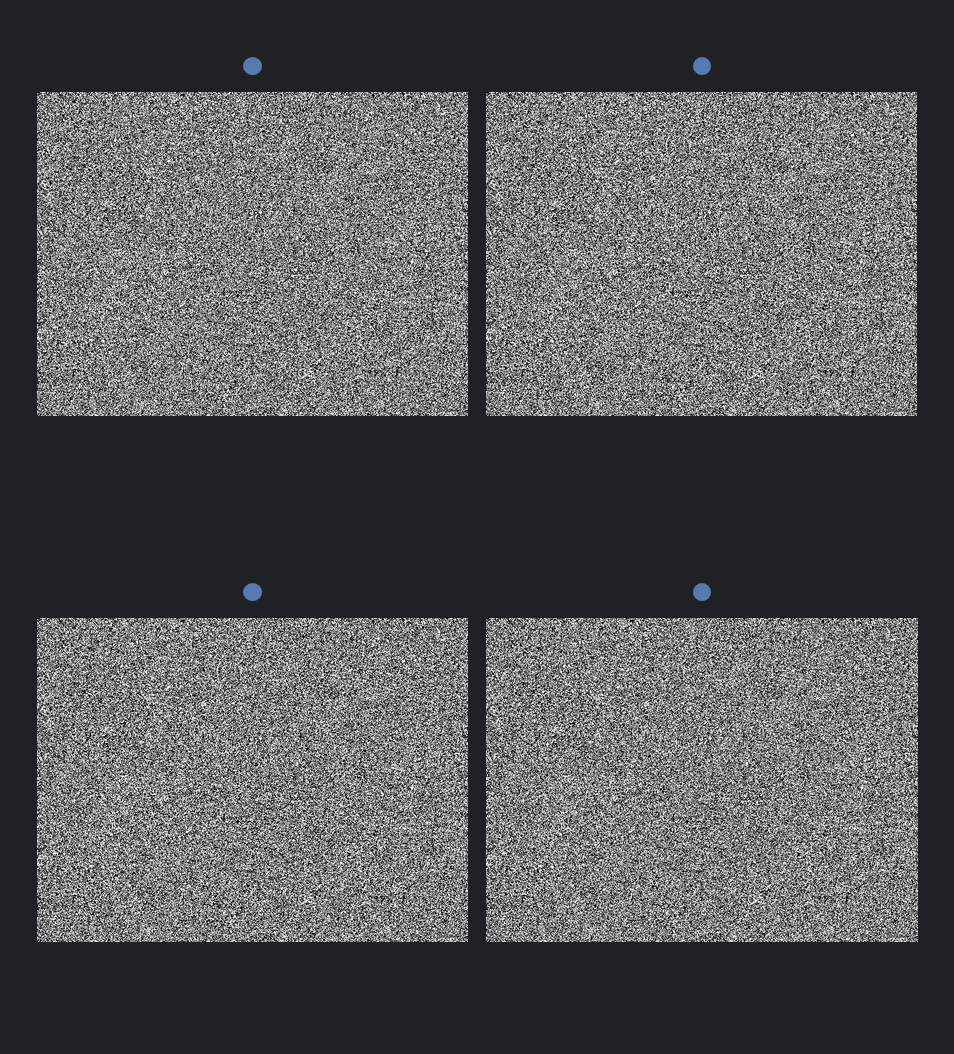
Figures 10 and 11 show, respectively, a stereogram made with photographs (instructions for obtaining similar photographs can be found here) and a Random-Dot Stereogram. As with the previous stereograms, these can also be viewed using the cross-eyed viewing method (top) or the parallel viewing method (bottom). These stereograms (and the remaining ones below) mainly serve to consolidate and practise mastery of one or both methods, which is why the content of the stereogram in Figure 11 is not revealed – can you see what it is?
Level 4 – Stereograms with animations
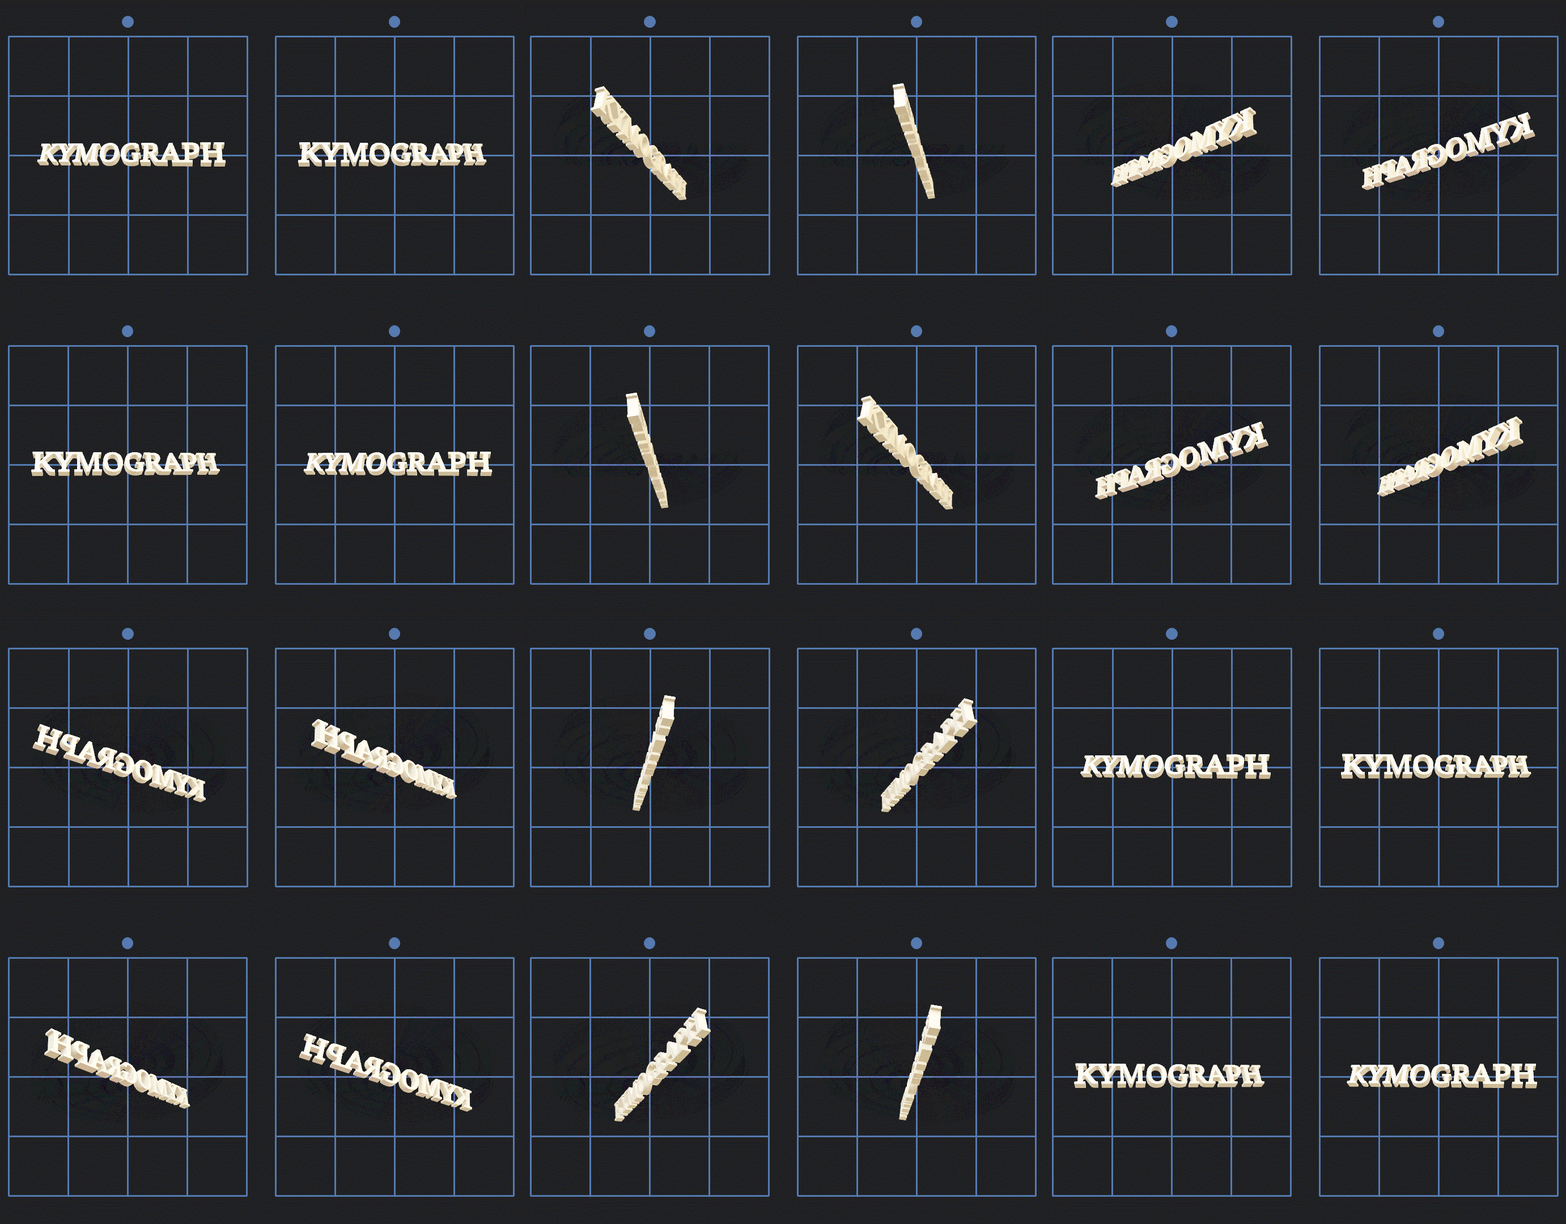
Although it is, theoretically, possible to watch an entire 3D film such as Avatar using the cross-eyed viewing or parallel viewing method, it would be considerably tiring given its duration, which is why 3D cinema uses specialised glasses for this purpose. Nevertheless, it should be emphasised that the existence of animation and motion is not, per se, an obstacle to stereoscopic perception using the methods presented here. Figures 12 and 13 therefore present some simple animations. The motion may be distracting, making these good challenges for mastering the cross-eyed viewing and parallel viewing techniques.
Level 5 – Autostereograms
Autostereograms, also known in the English-speaking world as Magic Eye, thanks to the books of the same name, consist of more or less abstract images. They contain horizontally repeated elements with small spatial offsets between them that replicate the binocular disparities underlying stereoscopic perception. Importantly, the resolution of these binocular disparities and, consequently, the perception of depth, can only be achieved with cross-eyed viewing or, more commonly, with parallel viewing. Being, even with careful instructions, particularly challenging to view, autostereograms are an excellent way to conclude the present guide.
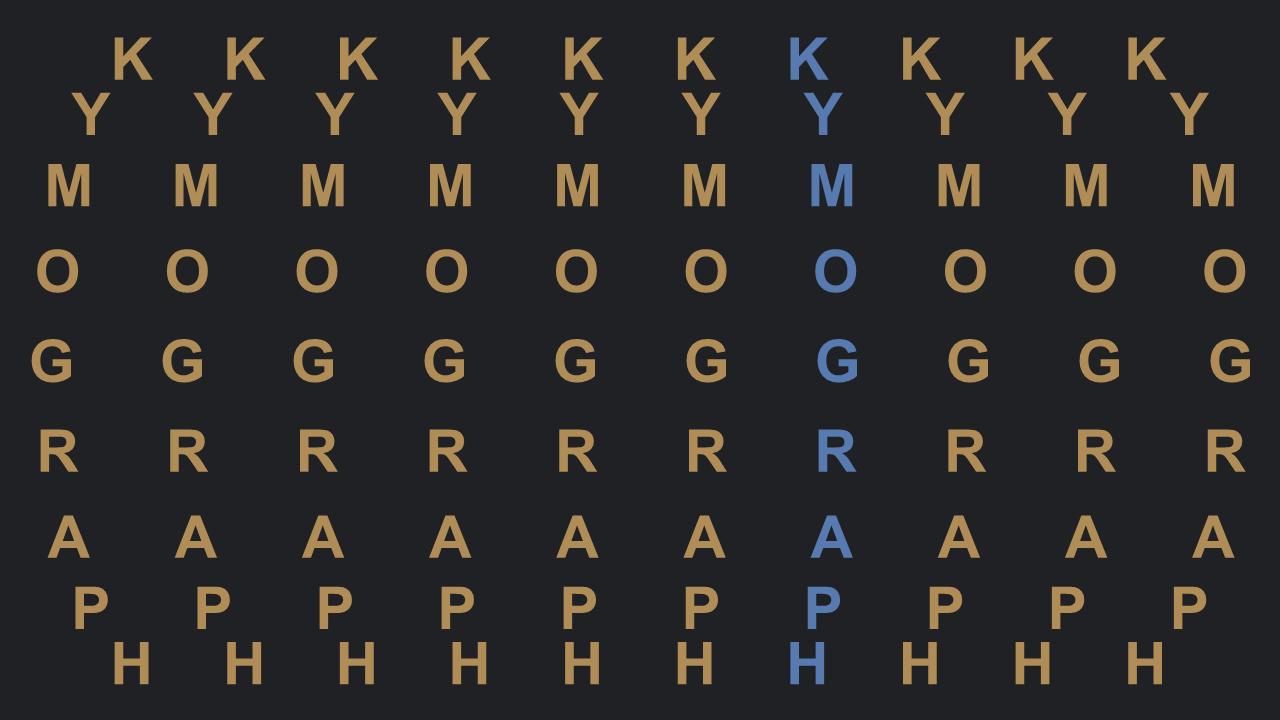
We therefore end with Figure 14, with a simple example, not only easier to see stereoscopically but also illustrative of the underlying principles. It presents several lines with the same repeated gold letters (the letters of the word "Kymograph"). Note that the letters K and H, respectively in the first and last lines, are closer together compared with the remaining letters, which are progressively more widely spaced – the line of Gs occupies the greatest horizontal extent. If this image is viewed with cross-eyed viewing or parallel viewing, some of the letters will coincide and will therefore be perceptually fused with adjacent letters. Because of their horizontal spacing, some of the lines will appear closer to or farther away from the observer, producing a vivid sense of three-dimensional space.
To aid correct stereoscopic fusion, the letters in one of the columns are blue. When fixating a point closer (cross-eyed viewing) or farther away (parallel viewing) than the screen, the reader should do so in such a way that they see not one, but two columns with bluish letters (because the blue letters will visually coincide with gold letters, their colour will be a slightly different bluish shade from the original blue). If this autostereogram is viewed with cross-eyed viewing, the middle lines will appear closer and the lines nearer the top or bottom of the image farther away; the reverse occurs with parallel viewing – the central lines appear farther away and the upper and lower lines closer.
If the reader can see stereoscopy in this simple autostereogram, they will be ready to explore other, more challenging autostereograms (these rarely include a highlighted column to assist stereoscopic fusion), whether in one of the many books available or on the internet, by searching for "autostereogram".